|
Occasional cleaning
|
|
Perform these occasional cleaning procedures when you notice a problem with the print quality or media feed reliability. Each procedure indicates a general guideline.
Click on the following topics for more information:
Back tension blade and paper clamp
- Clean the back tension blade when you notice ink on the leading margin of the print.
- Clean the paper clamp when the printer experiences frequent media jams.
Removing the media roll
- Lift the top cover latch (on the upper right side of the printer).
- Open the paper roll cover.
- Remove the media roll.
- Lock the top cover latch by pressing it down.
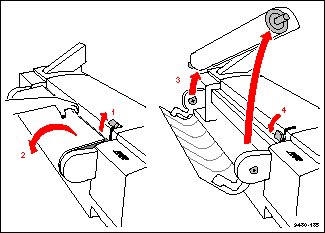
Setting the front panel for cleaning access
- On the printer's front panel, press the Menu button; the printer displays this message:
Help Pages
<---- ----> Menu
- Press the arrow button (--->) until you see this message:
Utilities
<---- ----> Menu
- Press the Menu button; the printer displays this message:
Test Print
<---- ----> Menu
- Press the arrow button until you see this message:
Clean Paper Clamp
<---- ----> Select
- Press the Select button. This raises the paper clamp. The front panel displays this message:
Open Top Cover
Cleaning the back tension blade
Warning:
The back tension blade, the steel belt behind it, and the paper clamp are very sharp.
To avoid personal injury, make sure that you use the cleaning tool and keep your
hands away from the blade and belt.
Note: For better visibility, you can
pull the printer away from
the wall and access it from
behind.
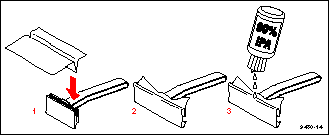
If the lint-free cloth has not been folded, fold it in thirds, as shown.
- Insert the folded edge of the cloth into the "V" opening of the cleaning tool.
- Wrap the cloth around the edges of the tool, as shown.
- If you are using a dry cloth, moisten it with 90% pure isopropyl alcohol.
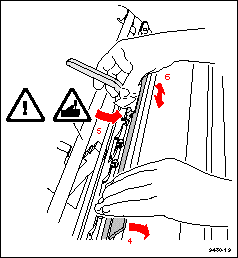
- Pull forward on the back tension blade's handle and hold it in that position; this lifts the blade away from the drum.
- Use your fingers to hold the cloth against the tool. Position the tool under the blade; it notches onto the blade to serve as a guide, cleaning the front and back of the blade at the same time.
- Clean one section of the blade by wiping back and forth 3-4 times with pressure.
- Switch hands to clean the other end of the blade.
Note: If the blade is especially dirty, you may need to add more alcohol to the lint-free cloth
or use a new cloth.
Cleaning the paper clamp
Caution: Make sure that you have set the printer's front panel to Clean Paper Clamp (Setting the
front panel for cleaning access); this allows easy access to the parts of the printer that
need to be cleaned.
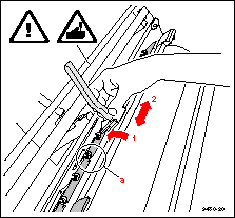
- Using a lint-free cloth that has been moistened with 90% pure isopropyl alcohol and inserted into the cleaning tool (see Cleaning the paper clamp), place the "V" opening of the tool over the paper clamp.
- Clean the clamp by wiping back and forth 3-4 times with gentle pressure. Clean a small section at a time and repeat the process until the entire clamp is clean.
Caution: The paper clamp is more flexible than the back tension blade; when cleaning the
clamp, do not use as much pressure as in the previous procedure, or you might bend
the clamp. Do not twist the tool when cleaning, or you might bend the clamp or catch
the cloth on the clamp's "cutouts" (a).
Clamp rollers
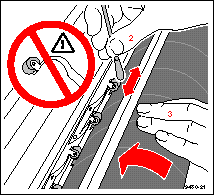 The clamp rollers are located behind the drum. Clean them when you notice ink offsetting or ink smears on your prints.
- Use a foam swab from the cleaning kit that has been moistened with 90% pure isopropyl alcohol.
- Clean the surface of the roller by rubbing it with the swab.
- Rotate the drum away from you (toward the back of the printer); this rotates the clamp rollers. Clean the entire surface of the roller.
Caution: Do not pull the roller away from the drum; the metal that attaches it to the printer is
very flexible and can be permanently bent.
- Repeat Steps 2 and 3 for each of the rollers.
Fuser shuttle and exit rollers
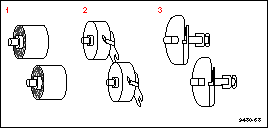 When you notice ink offsetting (most often occurring when fusing is turned on), or ink smears (most often occurring when fusing is turned off) on your prints, you can do the following:
- Clean the fuser shuttle and fuser wheel.
- Replace the fuser components.
- Clean the exit rollers.
The fuser kit (order number 016-1472-00) contains these replaceable parts:
- 2 foam oiler wheels: Replace when you replace the fuser wheel.
- 2 fuser wheels: Replace after printing 100-200 E-size (34 x 44 in.) sheets (approximately 100-200 m/300-600 ft. of 36-inch wide media roll).
- 2 cutters: Replace if paper cuts appear jagged or your printer experiences exit jams due to the cutter.
Setting the front panel
Note: Make sure that the media roll is not loaded and the printer's front panel displays
Ready.
- On the printer's front panel, press the Menu button; the printer displays this message:
Help Pages
<---- ----> Menu
- Press the arrow button (--->) until you see this message:
Utilities
<---- ----> Menu
- Press the Menu button; the printer displays this message:
Test Print
<---- ----> Menu
- Press the arrow button until you see this message:
Change Fuser or Cutter
<---- ----> Select
Press the Select button. The fuser shuttle moves to the far right side of the printer and the front panel displays this message:
Open Exit Cover
Refer to Exposing the fuser shuttle for instructions.
Exposing the fuser shuttle
Note: If you have not already removed the media roll, do it now.
- To open the exit cover, push the latch (a, on the lower right side of the printer) DOWN, while holding the exit cover handle (b); slowly rotate the cover down. The fuser shuttle (c) is visible on the far right, inside the printer.
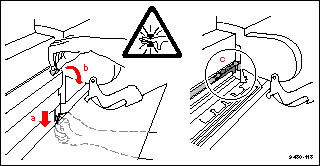
Warning:
When lowering the exit cover, be careful not to pinch your hand between the paper
roll cover and the exit cover.
Removing the fuser components
Note: You must remove the fuser wheel before the foam
oiler wheel.
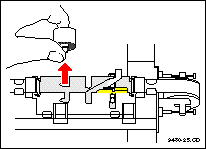
- Remove the fuser wheel (and media support) by lifting it out of the printer.
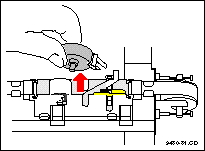
- Remove the foam oiler wheel. Be careful not to squeeze the foam; it is filled with oil and the oil might drip.
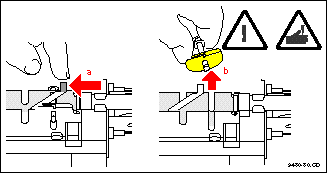
- Remove the cutter:
Warning:
The cutter blade is sharp. To
avoid injury, always handle it
by its shaft or yellow
protective cover.
- Slide the lever on the
cutter to unlock it.
- Lift the cutter out of the printer.
- If you are replacing the fuser components, dispose of the old components as normal office waste.
Cleaning the fuser shuttle
- If you have a small vacuum or air canister, use it to remove the paper dust.
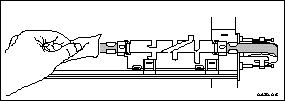
- Clean the belt (near the foam oiler wheel) with a dry, lint-free cloth.
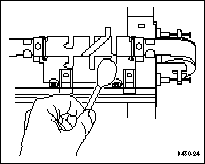
- If you notice ink in the fuser shuttle area, wipe it with a foam swab that has been moistened with 90% isopropyl alcohol.
Caution: Be careful not to get any alcohol on the front and
rear rails of the fuser shuttle or the "shelf"
underneath the shuttle. It is oiled for smooth travel
and the alcohol will remove the lubricant.
- If you are not replacing the fuser wheel, wipe it with an alcohol- moistened lint-free cloth.
Cleaning the exit rollers
Clean the exit rollers whenever you clean the fuser shuttle or replace its components.
Using an alcohol-moistened lint-free cloth, clean these parts:
- Wipe the metal exit roller thoroughly to remove any paper dust build-up; turn the roller to clean its entire surface.
- Wipe the metal fuser plate (especially the section closest to the rubber roller) to remove dust and ink.
- Wipe the rubber exit roller thoroughly; turn the roller to clean its entire surface.

Caution: To avoid damaging or obscuring the exit sensor, do not get any alcohol on it.
Inserting the fuser components
Whether you are inserting new components or re-inserting the existing ones, follow these steps:
- Insert the cutter blade into its slot on the fuser shuttle, making sure that the exposed blade is facing up, as shown.
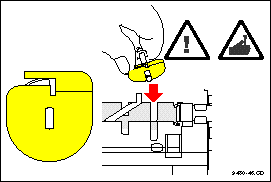
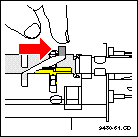
- Make sure that the cutter is seated in the slots on the fuser; secure the cutter by sliding the locking lever.
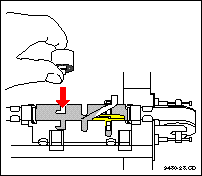
- Holding the foam oiler wheel by its shaft, insert it into its slot on the fuser shuttle. Be careful not to squeeze the foam; it is filled with oil and the oil might drip.
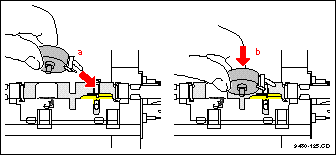
- Insert the fuser wheel (and the media support):
- Hook the prongs of the media support
onto the cutter's shaft.
- Lower the fuser
wheel into its slot on
the fuser shuttle.
Once in place, spin
the fuser wheel to
ensure that it is
installed properly.
- Make sure the fuser shuttle is pushed to the far right or left, then close the exit cover. If it is open, close the top cover and press down on the latch. When the printer warms up, the front panel displays Ready.
- Reinstall the media roll and close the paper roll cover.
Ink loader
Clean the ink loader if you notice these symptoms:
- Ink sticks do not fall when the slider(s) are pulled back.
- Sliders do not move easily (sticking).
- Ink loader jams.
Follow these steps to clean the ink loader:
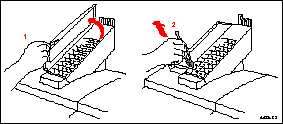
- Open ink loader cover.
- Remove any ink sticks that are still in the ink loader. Use a pair of tweezers or a sharp knife.
Note: If you need to remove the ink loader, first remove all ink sticks from the ink loader.
Refer to Removing the ink loader for instructions.
- Insert an alcohol-moistened swab into each opening and wipe back and forth to remove any ink residue.
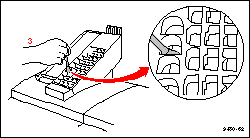
- Clean the bottom opening for each color.
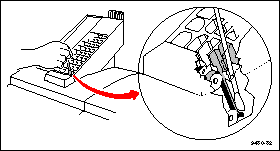
- Using an alcohol swab,
wipe all parts of the belt
that are accessible.
- Wipe the opening
around the belt that may
have ink build-up.
- After cleaning the ink loader, reload the ink sticks and close the cover.
Cleaning the printhead
If your prints have missing dots or a missing horizontal line, clean the printhead, using the front panel menu function:
- Press the Menu button on the front panel.
- Press an arrow button (--->) until the front panel displays this message:
Utilities
<--- ---> Menu
- Press the Menu button.
- Press an arrow button until the front panel displays this message:
Clean Head
<--- ---> Select
- Press the Select button.
The front panel displays messages while it cleans the printhead; this takes approximately 5 minutes.
- Press an arrow button until you see this message:
Test Print
<--- ---> Print
- Press the Print button; the Test Print demonstrates the condition of the printhead jets.
If this does not clear the problem, turn the printer off for two hours. When you turn the printer on again, print the Test Print from the Utilities menu in the front panel. If the problem still exists, you may need to call for a service technician to manually clean the head wiper. Refer to If you need help for information.


Printer Types | Topics
|
| |
|