|
Installing the starter paper roll
|
|
Click on the following instructions for loading the starter paper roll:

Loading the paper roll
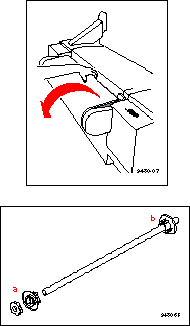
- Open the paper roll cover.
- Lift the paper roll holder out of the printer. Notice that each end of the holder is unique:
- The left side of the holder (closest to the ink
loader) has a removable plastic nut and
endcap.
- The right side of the holder (closest to the
front panel) has a fixed endcap.
Note: The endcaps are set up for media rolls with a
three-inch core; if you are using media on a two-inch
core, the endcaps can be adjusted. Refer to Using a
2-inch core media roll: removing the core adapter for
instructions.

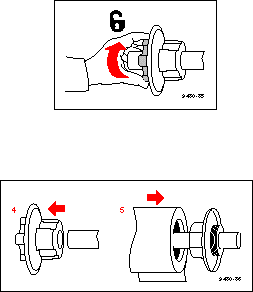
- Loosen the plastic nut by turning it until the endcap slides freely.
- Slide the removable endcap from the shaft.
- Slide the paper roll onto the shaft (make sure that the leading edge of the paper comes off the roll from behind, as shown); center the roll over the fixed endcap.
Caution: Gently slide the paper roll onto the shaft;
do not let it drop onto the shaft or it can
damage the fixed endcap.
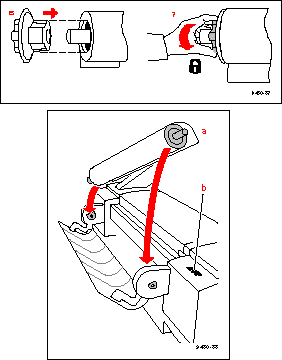
- Replace the removable endcap; it fits inside the core of the paper roll.
- Tighten the plastic nut to secure the endcap.
- Insert the paper roll holder into the printer as shown, with the fixed end (a) closest to the front panel (b).

Feeding roll paper
- When the printer is in the Ready state, the front panel displays this message:
- Make sure that the paper's leading edge is straight and smooth.
If it is not, use the cutting tool that was shipped with the printer to cut a smooth edge along the printer's cutting guide. Refer to Cutting roll media for complete instructions on getting a straight leading edge.

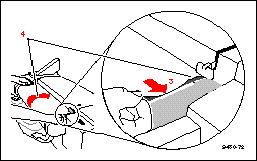
- With the paper roll cover open, use the guide on the right side of the printer to ensure that the paper enters straight.
- Holding the paper by the outside edges, guide the paper evenly into the slot between the top cover and printer body until it stops (about two or three inches) and buckles slightly.
- The printer picks the paper and advances it, and the front panel displays a series of messages (Loading...; Unloading...); when the media is successfully loaded, the Ready message appears.
Note: The printer advances the paper to measure the paper and calibrate for its width
(Loading...). Once the paper is measured, the printer reverses the paper
(Unloading...) so that it is aligned and ready to print.
- Close the paper roll cover.
|
| |
|