|
Connecting the printer
|
|
Note: Make all printer connections before you turn on the printer.
Printer ports
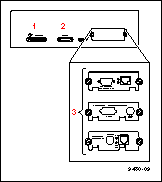
The printer is shipped with a SCSI port and parallel port on the printer's rear panel. Additionally, the printer can support one optional PhaserShare network card. All ports and network protocols are simultaneously active. The printer accepts print jobs on a first-come, first-served basis.
Note: See Ordering Interface cables and adapters about ordering cables for connecting
the printer.
- SCSI (standard)
For connecting these optional peripheral devices:

- Phaser Copystation To set up and connect the Phaser Copystation to your printer, refer to Chapter 2 of the Phaser Copystation User Manual. Required SCSI ID numbers are 5 and 6. Refer to Phaser Copystation for ordering information.
- External SCSI hard disk Provides additional storage for downloadable fonts (the printer has an internal 1-Gbyte SCSI hard disk). You can connect one or more SCSI external hard disks to the printer; available SCSI ID numbers are 0, 1, 2, 3.
- Parallel (standard)
The printer supports a standard (uni-directional) parallel port. The port can also be set for bi-directional communications using downloadable utility files (available on the printer's CD-ROM, diskettes, or from your World Wide Web browser).
- Use a high-density bi-directional parallel cable, available from most computer cable vendors; or order a 36-pin high-density printer to 25-pin DSUB PC cable from Xerox (order number: 012-1468-00). Otherwise, you can use a 36-pin to 36-pin parallel cable and the parallel adapter supplied with the printer.
- Connect a parallel interface cable to your computer and to the printer's parallel port:
- PhaserShare card (optional)
The printer accepts one of the following:
Adjust the leveling legs and lock the wheels
 It is very important that the printer be set up on a level, secure surface for the best print quality.
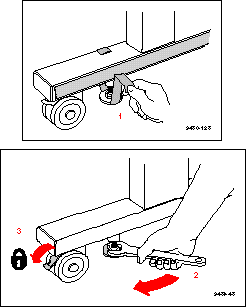
- Remove the adhesive tape that protects the leveling legs and the bottom of the printer.
- To adjust the four leveling legs under the printer, use a small, adjustable wrench to turn the nut on each leg to the desired height. If the floor is a smooth, non-carpeted surface, the leveling legs keep the printer from sliding.
- Lock the front casters by pressing down on the locking lever. If the floor is a carpeted surface, the casters alone keep the printer steady.
Turning on the printer
Caution: Before turning on the power to the printer, make sure that you have removed all
shipping material from inside the printer; otherwise, you can damage the printer.
See Removing the transit restraint, Removing the shipping blocks, and Removing adhesive
tape and cable tie.
- Transit restraint: (printhead) inside the printer's top cover.
- Cable ties: inside the printer's top cover.
- Shipping blocks: (fuser) inside the exit cover.
Make sure that you have attached the ink loader to the printer and that its cover is
closed; otherwise, the printer will not start up.
Caution: To protect your printer from a power surge, make sure that the power switch on the
printer is in the off position before plugging in the cord. You can also use a surge
protector that is designed for computer equipment.
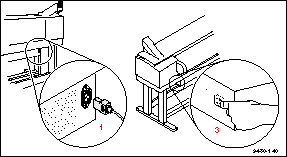
Make sure that you use the power cord that is shipped with the printer. If you need a new power cord, contact your local Xerox dealer.

- Plug the power cord into the printer and into a grounded outlet.
- Turn on the power to any peripherals you have connected (i.e., an external SCSI disk or the Phaser Copystation).
- Wait 1 minute, then turn on the printer.
What happens at power-up
- Both status indicators (power
 and error and error ) on the printer's front panel light briefly. Messages appear in the display panel (LCD) as the printer goes through a series of self-tests. ) on the printer's front panel light briefly. Messages appear in the display panel (LCD) as the printer goes through a series of self-tests.
- While initializing, the printer makes various mechanical sounds; the front panel displays this message as it performs an automatic head cleaning procedure:
The printer takes about 10-12 minutes to warm up and complete the self-tests (depending on the amount of memory installed).
Note: The printer's memory includes a startup page that is disabled by default. You can
turn on the startup page using either the front panel menu or a software utility file
provided on the CD-ROM or World Wide Web. Refer to Enabling and disabling the
startup page for details.
When the printer is ready for operation
When the power-up sequence is complete, the green indicator is on steady (not blinking), the red indicator is off, and the front panel displays this message:
|
| |
|