|
Setting up the printer
|
What you get with your printer
The printer and its accessories are shipped in a single box on a pallet. If you ordered an optional Phaser Copystation, it is shipped separately.
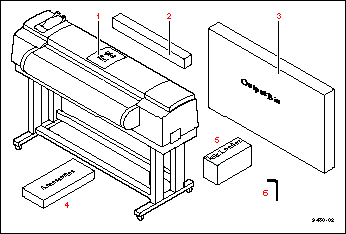 The following items are shipped with the printer:
- Quick-Start Instructions
- Starter roll of Xerox Smooth White Bond paper
- Output bin
- Accessories box (contents described on the next page)
- Ink loader
- Allen wrench
Accessories box contents
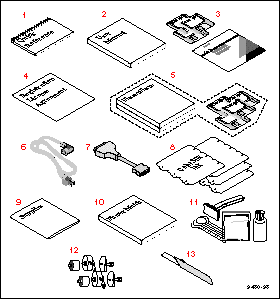
- Phaser 600 Color Printer Quick Reference Guide
- Phaser 600 User Manual
- Phaser 600 CD-ROM and diskettes
- Registration card and license agreement
- Optional PhaserShare manuals and diskettes
- Power cord
- Parallel adapter
- ColorStix® ink sticks
- Supplies information sheet
- PhaserMatch manual
- Cleaning kit
- Fuser kit
- Media cutting knife
Optional Phaser Copystation accessory
- Find the customer registration card that is appropriate for you (U.S. or international versions).
- Fill out the card and mail it.
By registering your printer with Xerox, you are validating the product warranty and ensuring that you will be sent information about upgrades, service, and accessories as it becomes available.
The Phaser 600 Color Printer Quick-Start Instructions describes how to remove the printer from its shipping pallet and prepare it for setup. It is an overview of the printer installation for experienced users. For detailed instructions, refer to the setup procedures in this user manual.
Note: Save all packing material in case you need to move or ship the printer.
If you have not already removed the printer from its shipping pallet, follow the instructions in the Quick Start Installation booklet before continuing with the hardware setup described in this chapter.
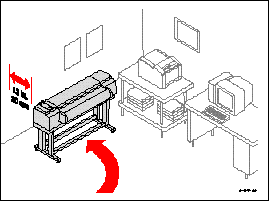 After removing the printer from the shipping pallet, you can wheel it to its operating location. When doing so, follow these guidelines:
- To move the printer, make sure that the casters are unlocked (the locking lever should be up).
- The casters on the printer are designed for rolling on smooth, inside surfaces.
- Make sure that you have access to all sides of the printer while you are setting it up.
- Allow 30 cm (12 in.) from the wall to accommodate the ink loader.
Caution: To reduce the possibility of damage to the ink loader, position the rear of the printer
against a wall, rather than an aisleway.
Removing adhesive tape and cable tie
- Remove the adhesive tape from the top cover.
- Remove the styrofoam block from the top cover latch.
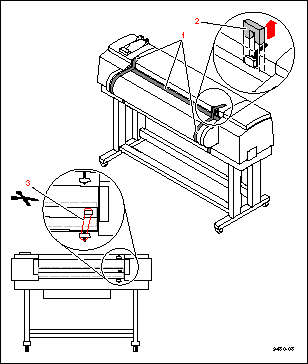
- Cut and remove the cable tie from the exit cover latch.
Removing the transit restraint
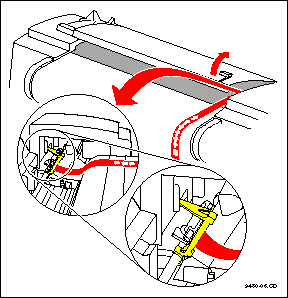
Caution: The transit restraint must be removed
before turning on the power;
otherwise you will damage the
printhead.
- To open the top cover, lift the latch and then lift the cover to an upright position.
The yellow transit restraint (attached to the red warning ribbon), protects the printhead during shipment. It is visible inside on the far right of the printer.

- Using your left hand, grasp the transit restraint, as shown. Use your index finger to lift the end of the restraint over the metal plate.
- Rotate the restraint toward you to release it from the printer. Save the restraint for future use.
- Cut and remove the three cable ties that secure the rollers.
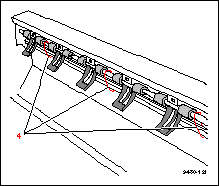
- Close the top cover, making sure that the latch is pressed down.
Removing the shipping blocks
Caution: The shipping blocks inside the exit cover must be removed before turning on the
power; otherwise you will damage the printer.
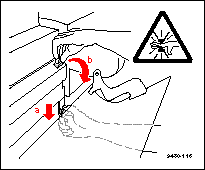
- Open the exit cover:
- Push down on the latch.
- Use the exit cover handle to
rotate the cover down.
Warning:
When lowering the exit cover, be careful not to pinch your hand between the paper
roll cover and the exit cover.
- Remove the blocks.
- Close the exit cover.
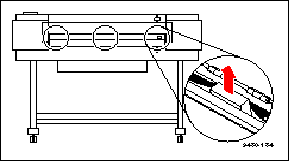
Attaching the ink loader
-
Remove the ink loader and the screw from the packaging. Remove the adhesive tape that secures the four sliders; then pull the sliders out to their fully extended position.
-
With the ink sliders fully extended, insert the ink loader into the printer as shown. Once the loader is fully inserted into the printer, move the sliders forward.
-
Insert the screw into the opening (on the rear side of the ink loader and printer) to secure the ink loader to the printer; tighten the screw by hand; no tools are necessary.
Loading the ink
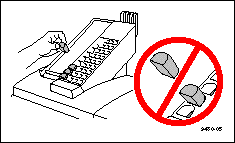
- Remove the ColorStix ink sticks from their packaging by peeling off the paper cover.
- Open the ink loader cover.
- Insert the ColorStix ink sticks into the appropriate holes for each color. Each color ink stick is uniquely shaped to make ink loading easy. Load the ink sticks from the bottom of the ink loader to the top.
Caution: Load only one ink stick in each slot; otherwise the ink sticks might jam and the cover
will not close.
Do not load more than eight ink sticks of any color at one time.
Open only the ink sticks you will immediately use; exposure to dust and overhandling can cause an ink jam.
- Slowly pull back each ink's slider to release the ink sticks into the printer.
- Close the ink loader cover.
Caution: Make sure that the ink loader cover is completely closed; otherwise, the printer will
not power up.
Attaching the output bin
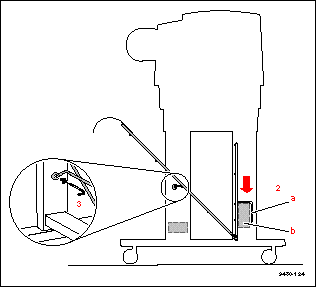
- Remove the output bin from its packing box. Also remove the small plastic bag that contains two bolts and an Allen wrench.
- With the output bin folded at its joint, hook the short end (a) over the back (upright) rail (b) of the printer.
- Align the openings of the long end of the output bin with the openings in the front legs of the printer. Insert a bolt into the opening on
each front leg; tighten them with the Allen wrench.
Attaching the Quick Reference Guide
The Phaser 600 Quick Reference Guide is designed to attach to the printer above the front panel.
- Remove the reference guide from the accessories box.
- Peel the backing from the double-sided tape.
- Press the booklet onto the top right side of the printer, above the front panel.
|
| |
|