|
Phaser Copystation
|
|
The Phaser Copystation adds easy-to-use, walk-up color copying capability to the Phaser 600 printer. Images scanned on the Copystation are sent to the printer through a direct SCSI connection. The Copystation is fully compatible with other SCSI devices, such as an external SCSI font disk.
Click on the following topics for more information:
Requirements and suggested memory configuration
For Copystation capability, the Phaser 600 requires the Extended Features option. You can also order additional memory (16 Mbytes or 32 Mbytes) for improved performance. For information on ordering a Copystation, refer to Phaser Copystation (order number 4540). For information on ordering additional memory, refer to Memory upgrade.
Connecting the Copystation
The Phaser Copystation User Manual is shipped with the Copystation; it contains detailed instructions for connecting and using the Copystation with your printer. Keep these tips in mind when connecting the Copystation:
- Always turn off the power to the printer and all SCSI devices before making connections.
- The printer and Copystation have built-in SCSI termination. If other SCSI devices are also connected to the printer, make sure that the Copystation is the last device in the chain, and that the other devices' terminators are disabled.
- Make sure that there are no conflicts in SCSI ID numbers for any of the SCSI devices connected to the printer. The Copystation uses SCSI ID numbers 5 and 6; the printer uses SCSI ID numbers 7 and 4.
- Always turn on SCSI peripheral devices (the Copystation and external disks) at least one minute before turning on the printer.
Setting the print quantity
The Copystation's front panel allows you to specify the number of copies you want output from the printer:
- Press the # of Copies button on the Copystation; use the keypad to enter the number of copies you want.
- Press the Copy button.
Note: When requesting multiple copies of an image, always use the Copystation's
# of Copies command; the printer's front panel Copies function is unavailable.
Scaling images from the Copystation
Automatic scaling
When the printer's front panel selection for Media Size matches the size of media that is installed in the printer, an image sent from the Copystation is automatically scaled up to fill the media's printable image area.
Custom scaling
To scale an image by a specific amount, use the Copystation's Scale function:
- Reduces the size of an image so that it is smaller than the installed media's printable area.
- Enlarges or reduces the image by a specific amount; also used when the front panel's media size setting does not match the installed media.
Note: When sending an image from the Copystation to the printer, always use the
Copystation's Scale command; the printer's front panel Scale function does not affect
Copystation output.
Getting the best results
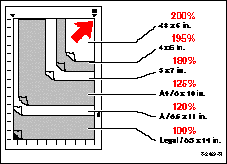
You can scan an image (for example, an 8 x 10 in. photograph) on the Phaser Copystation at pre-determined scale percentages, and your printer automatically scales the output to fit the selected media size.
 To scale an image, follow these steps:
- From the printer's front panel, use the Media Size selections in the Media Defaults menu to set the default page size for the desired copy size.
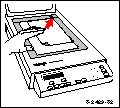
- Place the original image on the Copystation, starting in the upper right corner.
- Copystation's front panel - select the scaling percentage
 based on these examples: based on these examples:

Media size interactions
Copies that you make on the Copystation are automatically scaled to fit the default media size set for the printer in the front panel, regardless of the media that is loaded in the printer. If the printer�s default media size setting differs from the loaded media, your image may not print as expected. Also, the default media size selected in the printer�s front panel should not be larger than the actual media loaded in the printer.
|
Media size selected in the front panel
|
Media used
|
Results*
|
|---|
|
ANSI B 10.6 x 16 in.
|
ANSI C
16.6 x 21 in.
|
The media size selected in the front panel is smaller than the loaded media: Image does not fill the image area.
|
ANSI C
16.6 x 21 in.
|
ANSI C 16.6 x 21 in.
|
The media size selected in the front panel is the same as the loaded media: Image correctly fills the image area.
|
|
ANSI D 21.6 x 33 in.
|
ANSI C
16.6 x 21 in.
|
The media size selected in the front panel is larger than the loaded media: Image is cropped at the boundaries of the media�s printable image area.
|
|
* Assumes the Copystation is set for 100% scale.
|
Set the default media size in one of the following ways:
- Front panel
Media Size selections in the Media Defaults menu.
- Downloaded utility file
Refer to Downloading files to the printer or the World Wide Web for instructions on downloading a utility file.
Printing A-size images on A-size media
The printer's default media size cannot be set to A-size, nor can A-size be selected in the printer's front panel. If you are copying an A-size image to print out on A-size media, follow these steps:
- On the printer's front panel, access the Media Size selections in the Media Defaults menu.
- Select ANSI B, which is the smallest media size selectable from the front panel.
- On the Copystation's front panel, press the Scale button.
- Using the keypad on the Copystation, enter 83% (the amount necessary to scale a B-size image to A-size).
- Manually feed an A-size sheet of media into the printer.
- Place the item to be copied on the scanner window at the lowest, right-most position
- Press the Copystation's Copy button to make a print.


Printer Types | Topics
|
| |
|