|
Special printing features
|
|
Click on the following topics for more information:
This option is selected in supported printer drivers and from the front panel (Media Defaults menu). It determines whether and in what manner the print is fused. You can use this option with all media types, and with both cut-sheet and roll media.
- Cold (default)
Flattens the dots of color, which makes colors appear darker than if Media Fusing is set to None. Colors that are cold-fused are more resistant to flaking than non-fused colors.
- Hot
Softens the ink and flattens the printed dots of color, making the colors more resilient than with cold fusing. When using roll media, hot-fusing overrides the Advance Media option, and adds 225 mm (8.875 inches) of blank media after each page is printed, if cutting is disabled.
- None / Off
With fusing turned off, printing completes more quickly; also, possible banding and offsetting from the fuser are eliminated. However, prints may look lighter than when hot- or cold-fused, with more white paper visible around the printed dots of color. Inks may be less durable if they are not fused.
Hints
- When Hot is selected, the only available option for Advance Media is Allow Hot Fusing. Refer to Advance Media for more information.
- Media fusing behaves differently with different media types (some media may produce degraded print quality with fusing). Experiment until you get the best results. Xerox-supplied media usually look best with cold-fusing.
- When hot fusing is selected (or de-selected), the printer goes into a warm-up (or cool-down) period for approximately 15 minutes. If hot fusing has been selected, the printer's warm-up time also increases when the printer is turned on or comes out of standby mode.
- If you do not have a supported printer driver, you can use the PostScript utility files shipped on the printer's CD-ROM or diskettes. Refer to Downloading files to the printer for instructions on downloading utility files.
Advance Media
This option is selected in supported printer drivers and used only with roll media. The amount that the media is advanced is measured in points; the default advance is set to 72 points (25.4 mm, 1 inch), but it can be changed to your specification with a PostScript utility file that is shipped on the printer's CD-ROM or diskettes.
- Never / Off (default)
Prints one page after another without adding extra space after any pages.
- After Each Job / Per Job
Advances the media only after the last page of a job is printed.
- After Each Page / Per Page
Advances the media after each page is printed.
- Allow Hot Fusing
Automatically selected if the Fusing Mode option is set to Hot. Advances media automatically after each page is printed.
Hints
- If the Fusing Mode is set to Cold, None, or Printer's Default, the available options for Advance Media are Never, After Each Job, and After Each Page.
- If the Hot option for Fusing Mode is selected, the printer automatically selects Allow Hot Fusing for the Advance Media option; the other options are not available.
- If you do not have the Phaser 600 printer driver, you can use the PostScript utility files shipped on the printer's CD-ROM or diskettes. Refer to Downloading files to the printer for instructions on downloading utility files.
Cut Media
This feature is selected in supported printer drivers or from the front panel in the Media Defaults menu. It is used only with roll media.
- Never / Off
The printer does not automatically cut the media. This keeps the images together on the media roll, which is useful for processes such as lamination.
- After Each Job / Per Job
The printer automatically cuts the media only after the last page of a job is printed.
- After Each Page / Per Page (default)
The printer automatically cuts the media after each page is printed.
Hints
- Certain media do not cut well or may require that the automatic (internal) cutter be replaced more frequently. Because thick or fiber-based media (for instance, artist's canvas) can be difficult to cut, you may want to turn off the automatic cutting.
- The driver selection overrides the front panel default.
- If you do not have a supported printer driver, use the PostScript utility files shipped on the printer's CD-ROM or diskettes. Refer to Downloading files to the printer for instructions on downloading utility files.
Mirror Print
This option is selected in supported printer drivers. Mirror Print inverts an image left-to-right, before printing.
Hints
- Mirror Print is useful when printing on transparency film, so that the printed surface can be protected when mounted.
- If you do not have a supported printer driver, you can use the PostScript utility files shipped on the printer's CD-ROM or diskettes. Refer to Downloading files to the printer for instructions on downloading utility files.
Page Centering
This feature, available only in supported printer drivers, centers the requested page size on the actual page size of the media. For roll media, the image is centered from side-to-side. For cut-sheet media, the image is centered from side-to-side and from top-to-bottom.
Hints
- When you select Page Centering, make sure that media is already loaded before sending a job to the printer. If media is not loaded, the printer uses the default media size (the front panel setting) to calculate the center position. Depending on the default setting and the requested size, the image can be clipped or missing.
Page Rotation
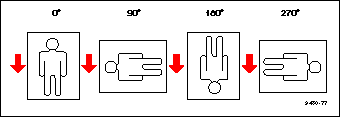
The Page Rotation option, selectable in supported printer drivers, changes the way that the image is marked on the paper.

- 0° / None (default)
- 90°
- 180°
- 270°
In this illustration, the arrow indicates the leading edge of the media (the leading edge is the side of the media that enters the printer first).
- Rotating an image 90° or 270° is useful for printing a small image on large media; for example, a Tabloid-size image on a 36-inch (914 mm) media roll.
- Rotating an image 180° changes the top and bottom margins on cut-sheet media, relative to the image.
- If you do not have a supported printer driver, you can use the PostScript utility files shipped on the printer's CD-ROM or diskettes. Refer to Downloading files to the printer for instructions on downloading utility files.
Image Smoothing
Image Smoothing is selected from the printer's front panel (in the Printer Defaults menu) as well as in supported printer drivers. Image Smoothing blends adjacent colors in an image so that color transitions are less noticeable.
This feature is typically used when the image being printed is at a lower resolution than the printer's output resolution. For example, printing an image downloaded from the World Wide Web at 72 dpi using the printer's 300 dpi. Images printed using Image Smoothing appear with less sharp detail but with smoother color transitions. Image Smoothing does not affect images at 150 dpi or higher. Due to extra internal calculations, printing may take longer with Image Smoothing on.
Hints
- If you do not have a supported printer driver, you can use the PostScript utility files shipped on the printer's CD-ROM or diskettes. Refer to Downloading files to the printer for instructions on downloading utility files.
Fast Preview
The Fast Preview option is only available for the Photoshop plug-ins. It produces a quick print of your image with slightly reduced image quality. This option reflects the color correction you have selected for this image.
- For lower resolution images, you can improve the print quality of Fast Preview prints by activating the Image Smoothing option.
Print Preview
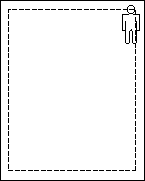
This Extended Features option, selected in supported printer drivers, prints a small thumbnail version of the job's first page. The image is reduced by one-fifth in height and width, or to Tabloid-size (11 x 17 in.), or its Metric equivalent, whichever is smaller. A dashed outline indicates the full-sized image and its placement.

Once the preview image is printed, the printer's front panel displays this message and waits for user interaction:

|
|
|
|---|
|
Cancel
|
Ends the Print Preview, returning the printer to Ready.
|
|
Pause
|
Enters the Pause menu, which allows you to print the image at a different scale. Scale selections include:
- 25% to 400%
- Scale to Fit, which automatically scales the preview image to fit the media installed in the printer or, if media is not installed, the front panel selection.
|
|
Print
|
Prints the full-size image and all subsequent pages of the print job.
|
Timeout
- The printer waits a set amount of time for the user to press a front panel button. If no button is pressed in that time, the job is cancelled and the printer returns to Ready.
- The default timeout is 15 minutes; to change the default, use the PostScript utility file that is available from Technical Support.
Color Control Strip
This feature, when selected in a supported printer driver, prints a band of colors along the bottom edge of your print. The color control strip is useful for checking the consistency of printed colors between prints made on the same printer, or between prints made on more than one of the same type or model of printer.
The color control strip has these qualities/features:
- Includes the printer's eight primary and secondary colors:
|
|
|
|---|
- Cyan
|
- Red (magenta and yellow)
|
- Magenta
|
- Green (cyan and yellow)
|
- Yellow
|
- Blue (cyan and magenta)
|
- Black
|
- Black (cyan, magenta, and yellow)
|
- Each color is printed at 100% saturation (brightness) and 50% saturation.
- The color strip includes the following information:
Reprint
The Reprint function is available in the front panel's Pause menu if an Extended Features option is installed. It allows you to reprint the last PostScript image with the following options:
- Scale
- Enlarges an image up to 400% of the original size; an A-size image can be scaled to E-size.
- Reduces an image to a minimum of 5% of the original size; an E-size image can be scaled down to A-size.
- Scale to Fit, which automatically scales the image to fit the media installed in the printer or, if media is not installed, the front panel selection.
- Copies
- Allows you to specify the number of copies you want printed.
Custom page sizes
Most drivers that support the Phaser 600 printer allow you to set custom page sizes in the Page Size selection area.


Printer Types | Topics
|
| |
|