|
All about media
|
Media sizes
This printer supports three sizes of media trays:
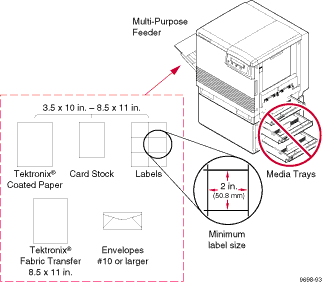
In addition to using the media trays, you can load specialty media in the Multi-Purpose Feeder, which accommodates media ranging in size from 89 x 254 mm to 216 x 356 mm (3.5 x 10 in. to 8.5 x 14 in.). For more information on specialty media, refer to Using the Multi-Purpose Feeder and Loading specialty media in the Multi-Purpose Feeder.
When the printer places an image on media, the image (print area) is a bit smaller than the media size. You may need to adjust the page margins in your application software to match the print area.
Note: To assure the correct page margins, use the drivers supplied on
the printer's CD-ROM and diskettes.
The following table and illustration show the page sizes, the largest print areas, and the margins for the media sizes supported on this printer.
This printer accommodates several types of media in various sizes. Paper and transparencies can be loaded in either the Multi-Purpose Feeder or any of the media trays.

Specialty media can only be printed from the Multi-Purpose Feeder.
You can select a media type in the printer's front panel or in a supported printer driver.
The printer is shipped with a paper tray, either Letter Paper (U.S.) or A4 Paper (Metric), depending on the order option. Optional trays (either Letter Transparency, A4 Transparency, or Legal Paper) are also available:

When you select a media tray by location, the printer picks media from that tray, regardless of the tray's media type or size.
- Push down on the paper tray's metal plate until it clicks, locking it in place.
- Fan the paper, but be careful not to leave fingerprints, which can result in a smudged print.
- Place paper in the tray under the hooks.
- You can load approximately 250 sheets of paper, depending on the thickness. Use the label on the inside of the tray as a reference for the proper amount of media.

- Insert the paper tray into any of the three tray slots on the printer.
Loading letterhead paper
- Push down on the paper tray's metal plate until it clicks, locking it in place.
- Fan the letterhead paper, but be careful not to leave fingerprints, which can result in a smudged print.
- Load the letterhead paper in the tray so that the side to be printed is face down and the top of the page is placed under the hooks.
- You can load up to 250 sheets of paper, depending on its thickness. Use the label on the inside of the tray as a reference for the proper amount of media.

- Insert the paper tray into any of the three slots on the printer.
Loading transparencies
- Push down on the transparency tray's metal plate until it clicks, locking it in place.
- Fan the transparencies, but be careful not to leave fingerprints, which can result in a smudged print.
- Place transparencies in the tray under the hooks.
- Load the transparencies so that the notched corner is placed closest to the media level label (5).
- You can load approximately 100 sheets of transparency film. Use the label on the inside of the tray as a reference for the proper amount of media.
- Insert the transparency tray into the Upper or Middle trays slot on the printer.

Hints for making transparencies
Follow these guidelines when you make transparencies:
Using the Multi-Purpose Feeder
The Multi-Purpose Feeder serves as another tray for loading any type of media that ranges in size from 89 x 254 mm to 216 x 356 mm (3.5 x 10 in. to 8.5 x 14 in.). You can use it to load a single sheet or a stack of media, depending on the media's type and thickness.
Use the Multi-Purpose Feeder to accomplish the following:
Note: For detailed information on loading specialty media and setting
the appropriate media thickness, refer to Loading
specialty media in the Multi-Purpose Feeder.
Duplex printing (double-sided) on laser paper
Because the printer accommodates varying media weights in the Multi-Purpose Feeder, you can manually select a media thickness for the most reliable paper-picking. The Media Thickness switch is only applicable for the Multi-Purpose Feeder.
Follow these steps to adjust the media thickness:
- Open the left side door. The blue Media Thickness switch is located on the paper feeder and has three settings:
- Thin
- Medium
- Thick
- Move the switch to the setting for the desired media. Use the guidelines in the following table to determine which type of media requires which setting.
* For the best coverage when using heavy laser paper (over 105 g/m 2, 28 lb.) in the Multi-Purpose Feeder, select Card as the media type.
Inserting the media
For instructions on loading specific types of media, refer to Loading specialty media in the Multi-Purpose Feeder.
- Adjust the guides to the width of the media you are using.
- Insert the media with the side to be printed up and the top of the page entering the printer first.
- Take care not to overfill the Multi-Purpose Feeder: keep the media to just below the limit indicator.
Capacity in the Multi-Purpose Feeder varies, depending on media thickness. These are general guidelines:
- Select the Multi-Purpose Feeder in the printer driver or the printer's front panel (refer to the next topic).
Selecting the Multi-Purpose Feeder
Select the Multi-Purpose Feeder in one of these two ways:
Transparencies
- Set the Media Thickness switch to Medium.

- Adjust the guides for the width of your transparencies.
- Insert the side with the notched end into the printer last, with the notched corner closest to the back of the printer.
- Fill the Multi-Purpose Feeder to the level indicator on the guide (maximum capacity is 50 sheets).
- Use your printer driver or the front panel menu to select the Multi-Purpose Feeder and the media type (Transparency ).
Letterhead
- For the thickness setting, treat letterhead media as you would laser paper. If your letterhead paper has a weight of 105 g/m2 (28 lb.) or lighter, adjust the printer's Media Thickness switch to Thin; if its weight is 109 - 150 g/m2 (29 - 40 lb.), adjust the printer's Media Thickness switch to Medium; if its weight is heavier than 150 g/m2 (40 lb.), adjust the printer's Media Thickness switch to Thick.

- Adjust the media guides for the width of your paper.
- Insert the letterhead paper with the side to be printed up; the top of the page enters the printer first.
- Fill the Multi-Purpose Feeder up to the level indicator on the guide (maximum capacity is 100 sheets, depending on the media's thickness).
- Use your printer driver or the front panel menu to select the Multi-Purpose Feeder and the media type (Paper ).
Glossy Coated Paper and Card stock
- Adjust the printer's Media Thickness switch: Medium for Glossy Coated Paper and Thick for Card Stock.

- Adjust the media guides for the width of your media.
- Insert the media with the side to be printed up and the top entering the printer first.

- Fill the Multi-Purpose Feeder up to the level indicator on the guide (maximum capacity is 50 sheets).
- Use your printer driver or the front panel menu to select the Multi-Purpose Feeder and the media type (either Coated Paper or Card or Envelope).
- If the media is a non-standard size, you must position the image correctly in the application.
- Select a printer page size that is larger than your media.
- Center the image of your media at the top center of the
selected size in your application.

Caution: To avoid media jams and damage to the printer components,
make sure that you follow these guidelines:
Envelopes
- Adjust the Media Thickness switch to Thick.

- Adjust the media guides for the width of your envelopes.
- Insert the envelopes with the short end entering the printer first and the side to be printed facing up; the edge where you place the stamp enters the printer first.

- Fill the Multi-Purpose Feeder up to the level indicator on the guide (maximum capacity is 10-15 envelopes, depending on thickness).
- Use your printer driver or the front panel menu to select the Multi-Purpose Feeder and the media type (Card or Envelope).
- If the media is a non-standard size, you must position the image correctly in the application.
- Select a printer page size that is larger than your media.
- Center the image of your media at the top center of the selected
size in your application.

Caution: To avoid media jams and damage to the printer components,
make sure that you follow these guidelines:
Labels
- Adjust the Media Thickness switch to Thick.

- Adjust the media guides for the width of your label sheets.
- Insert the label sheets with the side to be printed up, with the top of the sheet entering the printing first.

- Fill the Multi-Purpose Feeder to the level indicator on the guide (maximum capacity is 30 label sheets).
- Use your printer driver or the front panel menu to select the Multi-Purpose Feeder and the media type (Label).
Caution: To avoid media jams and damage to the printer components,
make sure that you follow these guidelines:
Tektronix Fabric Transfer Media
- Set the Media Thickness switch to Thick.

- Adjust the media guides for the width of your Fabric Transfer media.
- Insert only one sheet of media at a time, with the side to be printed up (logo side down) and the top of the media entering the printer first.

- In the application, reverse the image horizontally (the image must print backward to transfer correctly).

- Use your printer driver or the front panel menu to select the Multi-Purpose Feeder and the media type (Fabric Transfer).
Caution: To avoid media jams and damage to the printer components,
make sure that you follow these guidelines:
Duplex printing
This printer allows you to print double-sided on laser paper, from the paper trays and the Multi-Purpose Feeder.
Caution: Use laser bond paper for duplexing; two-sided printing on specialty media can shorten component life. For opacity and feed reliability, use laser paper that is at least 100 g/m2 (28 lb. bond). For best results, do not use heavy toner coverage on Side 1.
Double-sided printing with a paper tray
Side 1
- Place the paper in the paper tray with the side to be printed face down.
- If printing a multi-page document:
When printing the file from your application, make the following selections:
 Odd-Numbered Pages Odd-Numbered Pages
 Even-Numbered Pages Even-Numbered Pages
- Make print selections in either the front panel menu or the printer driver, then send the print job:
- Remove the printed paper from the output tray.
Side 2
- Place the paper in the paper tray in this way:
- If printing a multi-page document:
When printing the file from your application, make sure that you make the following selections:
 Odd-Numbered Pages
Even-Numbered Pages Odd-Numbered Pages
Even-Numbered Pages
- Make print selections in either the front panel menu or the printer driver, then send the print job:
* If you have a Lower Tray Assembly, make sure that you select the specific tray location (Upper, Middle, or Lower) in which you loaded the PAPER tray with your printed page(s).
Caution: Use laser bond paper for duplexing; two-sided printing on specialty media can shorten component life. For opacity and feed reliability, use laser paper that is at least 100 g/m2 (28 lb. bond). For best results, do not use heavy toner coverage on Side 1.
Side 1
- Place the paper in the Multi-Purpose Feeder with the side to be printed face up.
- If printing a multi-page document:
When printing the file from your application, make sure that you make the following selections:
 Odd-Numbered Pages Odd-Numbered Pages
 Even-Numbered Pages Even-Numbered Pages
- Make print selections in either the front panel menu or the printer driver, then send the print job:
* If you are using a supported driver, make the front panel selections noted in this table before sending the print job. The driver selection Multi-Purpose Tray automatically selects the media type defined in the front panel.
- Remove the printed paper from the output tray.
Side 2
Caution: When printing Side 2 for duplex printing (using the Multi-Purpose Manual Feed), always choose Paper 2nd Side as the media type. This selection is specially formulated for this purpose; choosing any other media type can reduce component life.
- Place the paper in the Multi-Purpose Feeder in this way:
- If printing a multi-page document:
When printing the file from your application, make sure that you make the following selections:
 Odd-Numbered Pages
Even-Numbered Pages Odd-Numbered Pages
Even-Numbered Pages
- Make print selections in either the front panel menu or the printer driver, then send the print job:
|
| |
|