|
Connecting an
IDE hard disk drive
|
Required Items
Internal IDE Hard Disk Drive (order number ZDISK3)
Static Electricity Precautions
-
Leave the printer plugged into its power outlet; this preserves a ground path for static discharges.
-
Touch the printer's bare metal frame often to discharge static electricity from your body.
-
Handle the circuit board by the edges only.
-
Do not lay the board on a metal surface.
-
Make the least possible movements to avoid generating static electricity.
-
Avoid wearing wool, nylon, or polyester clothing; they generate static electricity.
Installing the IDE hard disk drive
-
Turn off the printer. Disconnect the rear panel cables if they obstruct your work.
-
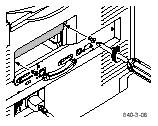
If your printer has a network card, remove it and the metal plate above it. Otherwise, remove both metal plates on the back of the printer.
-
Remove the hard disk drive from its packaging.
-
Slide the hard disk drive into the upper card slot and firmly push it into place.
-
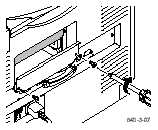
Secure the hard disk drive in place with the mounting screws and make sure that the screws are tight.
-
Insert the network card, or attach the lower cover plate and secure with the mounting screws.
-
Reconnect any cables that were disconnected, and turn on the printer.
-
From the printer's front panel, print a Startup Page and check it to make sure that the hard disk drive is present.
-
At your computer, reconfigure the printer driver. For more information, refer to
Configuring the printer driver.

Configuring the
printer driver
After the internal IDE hard drive installation is complete, the printer driver needs to be configured before you can use your installed hard drive.
NOTE
If the printer driver is not configured properly, some printer options will not be recognized.
Windows 95 , Windows 98 , Windows NT4
-
From the
Start
menu, select
Settings, then select
Printers.
-
Select your Xerox printer driver. From the pop-up menu, choose
Properties.
-
Click the
Device Options
(Windows 95/Windows 98) or
Device Settings
(Windows NT4) tab.
-
Under
Installable Options, select the options that are installed in your printer (for example, memory configuration, High-Capacity Paper Tray Assembly, or internal hard drive); this information can be found on the Startup page. Setting up the driver allows you to select all printer options when printing.
|
NOTE
Do not change the value for
Available PostScript Memory Setting; this value is automatically set.
|
-
Click
OK.
Macintosh
-
From the Apple menu, select
Chooser.
-
Click the icon of the printer driver (LaserWriter 8) on the left side of the window.
-
Click the Zone for your printer, if applicable.
-
From the list of printers, select your printer. If it is not in the list, check the hardware connections and verify that you have selected the correct zone in the
Chooser
on the left side of the window.
-
Click
Setup/Create
to select the correct PPD (PostScript Printer Description) file.
-
After the automatic setup has completed, click
Setup
and click
Configure.
-
Select the options that are installed in your printer (for example, memory configuration, High-Capacity Paper Tray Assembly, or internal hard drive); this information can be found on the Startup page. Setting up the driver allows you to select all printer options when printing.
-
Click
OK.
-
Close the
Chooser.
Return to Topic List
|
|
| |
|