|
You need to clean the printer when the following occur:
-
Media jams are frequent.
-
Prints are striped or smeared.
How often you need to clean the printer will depend on how heavily the printer is used and the environment in which it is used.
Using the front panel: Some cleaning procedures are executed through the printer's front panel, in the
Troubleshooting
menu. Front panel messages guide you through the steps of the procedures.
If the printer has frequent media jams
Light stripes on prints
If prints have narrow, lengthwise stripes that are faded or the wrong color, or prints have missing colors, run the automatic printhead-cleaning sequence from the printer's front panel.
-
When the
Ready to Print
message appears, scroll to
Menu; press
Select.
-
Scroll to
Troubleshooting; press
Select.
-
Scroll to
Eliminate Light Stripes; press
Select.
-
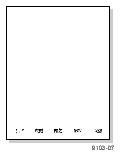
A series of front panel messages indicate the condition of the printer as it progresses through a sequence of automatic cleaning routines. The printer outputs a Cleaning Page (see
The Cleaning Page
) at the end of the cleaning sequence that you may discard as normal office waste.
-
To confirm that the problem has been corrected, print a Test Page from the
Troubleshooting
menu. Check for any missing color bars on the Test Page. The following illustration shows a correct Test Page with black (
1
), cyan (
2
), magenta (
3
), and yellow (
4
). Also shown is an example of a Test Page with a missing color bar in the magenta.
-
If one or more of the color bars are still missing or are light, repeat the cleaning sequence.
|
NOTE
The second cleaning sequence implements a more extensive cleaning of the printer, which may take longer for the printer to execute than the previous cleaning.
|
-
Return the printer to normal operation by scrolling to
Exit
and pressing
Select. The
Ready to Print
message appears when the printer is returned to normal operation.
-
If your prints still have color stripe problems after the second cleaning sequence, turn the printer off for at least 4 hours to allow the ink to solidify. When the printer is turned back on, it will perform a self-cleaning routine that may resolve the problem.
-
If your prints still have color stripe problems, service may be required.
The Cleaning Page
The Cleaning Page, a page with a series of narrow, colored stripes, is output each time the printhead is cleaned. This occurs at the following times:
-
When you run the cleaning procedure to eliminate light stripes in your prints. Refer to
Light stripes on prints
for more information.
-
During the printer's warming-up routine.
-
After emerging from Energy Star standby mode.
|
1
Red
|
2
Green
|
3
Blue
|
4
Black
|
Selecting the Cleaning Page source
The default source for the Cleaning Page or other paper that the printer uses in its cleaning procedures is the lower tray. When one or two High-Capacity Paper Tray Assemblies are installed, you can ensure that the printer always uses paper from the lower or middle paper tray in its self-cleaning procedures by changing a setting in the printer's front panel as follows:
-
When the
Ready to Print
message is displayed, scroll to
Menu
and press
Select.
-
Scroll to
Printer Configuration; press
Select.
-
Scroll to
Default Printer Settings; press
Select.
-
Scroll to
Advanced Printer Settings; press
Select.
-
Scroll to
Cleaning Page Source; press
Select
and choose the desired tray.
-
Scroll to
Exit; press
Select
to return the printer to the
Ready to Print
message.
You can also change the default through PhaserLink software if you are connected to a network via TCP/IP. Simply enter your printer's IP address in a standard web browser. Refer to the
PhaserShare Networking Manual
for details.
Cleaning supplies
Your printer is shipped with a cleaning kit that contains the following supplies:
-
Foam-tipped swabs
-
Presoaked alcohol wipes
Using isopropyl
alcohol
If you purchase isopropyl alcohol, always use alcohol that is at least 90% pure; alcohol that has additives can damage the printer.
WARNING
Alcohol is flammable; keep alcohol-soaked wipes and swabs away from hot surfaces.
Cleaning for
oily streaks
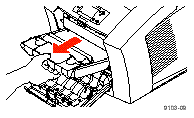
If your prints show oily streaks, you can clean the wiper blade that is located inside the maintenance drawer (A).
-
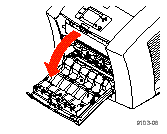
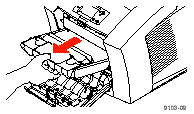
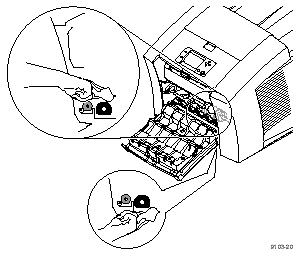
Open the front cover and remove the maintenance drawer (A).
-
Use a lint-free wipe to gently wipe any excess debris from the clear plastic wiper blade.
-
Reinsert the maintenance drawer into the printer.
Cleaning for ink
smears and jams: internal paper path
Clean the printer's internal paper path surfaces if your prints have stray ink marks on the front or the back.
CAUTION
Always use clean sheets of paper to clean the paper path. Do not reuse cleaning sheets. High-grade, heavier papers, such as 120 g/m2 (32 lb.) bond, work best.
-
Load high-grade paper into the printer and make sure that the tray's media selector switch is set to
Paper. If your printer is configured with just the upper media tray, load that tray and set the media selection switch to
Paper. If you have installed one or two High-Capacity Paper Tray Assemblies, load either the upper tray or the lower tray. The lower tray is the default; if you use the upper or middle paper tray, make sure that the printer's default has been set. Refer to
The Cleaning Page
for details.
-
When the printer is on and the
Ready to Print
message appears in the front panel, scroll to
Menu; press
Select.
-
Scroll to
Troubleshooting; press
Select.
-
Scroll to
Remove Ink Smears; press
Select.
-
After a short delay during the warm-up period, the printer begins an automatic sequence of feeding several clean sheets of paper from the media tray selected as the cleaning page source.
|
NOTE
For printers with Plus Features:
The last few sheets are fed through the duplex paper path.
|
-
When the cleaning sequence is complete, inspect the last sheet of paper fed through the printer. If it is not clean, repeat the cleaning sequence.
-
Scroll to
Exit; press
Select. After a warm-up cycle, the printer returns to normal operation.
If the ink smear problem persists: Refer to the following two procedures for directions on cleaning paper-feed rollers and the paper-exit path.
Cleaning for ink smears and jams: paper-feed rollers
The paper-feed rollers carry the print media from the media tray and manual feed slot through the printer. Occasionally, stray ink particles become attached to the paper-feed rollers, creating slick roller surfaces that cause media to feed improperly. Clean the paper-feed rollers if either of the following conditions exist:
CAUTION
Hot surfaces exist behind the middle paper-feed rollers. To avoid personal injury during cleaning procedures, do not reach in behind these rollers.
-
Open the front cover.
-
Remove the maintenance drawer (A) from the printer.
-
The upper paper-feed rollers are located above the slot for the maintenance drawer (A). To clean these rollers:
-
Use a prepackaged alcohol-soaked wipe.
-
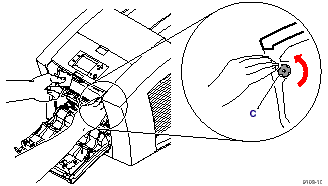
Place the cleaning wipe against each upper rubber roller, pressing to create pressure against the roller.
-
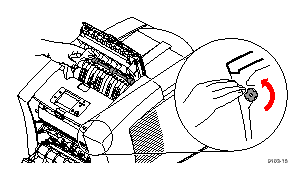
Use the thumbwheel to turn the upper rollers. The upper rubber rollers should rotate four or five complete revolutions for each roller segment to ensure proper cleaning. Scrub each roller thoroughly. If the wipe becomes dirty, discard it and use another.
-
To clean the middle rubber feed roller behind metal plate:
-
Use a prepackaged alcohol-soaked wipe. Place the cleaning wipe against the underside of each middle roller.
-
Manually rotate the middle roller.
-
Scrub each roller thoroughly. If the wipe becomes dirty, discard it and use another.
-
The lower paper-feed rollers are located below the maintenance drawer (A): one set of rollers is black rubber; the other set is white plastic. To clean the lower rollers:
-
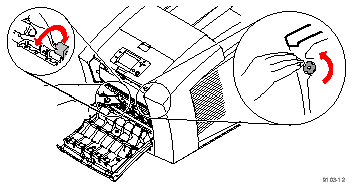
Use a prepackaged alcohol-soaked wipe. Place and hold the cleaning wipe on top of the white and black rollers.
-
Use the thumbwheel to turn the rollers. Rotate the rollers four or five complete revolutions for each roller segment to ensure proper cleaning.
-
Scrub each roller thoroughly until clean. If the wipe becomes dirty, discard it and use another.
-
Put the maintenance drawer (A) back into the printer.
-
Close the front cover.
Cleaning for ink smears: paper-exit path
If you have already performed the other "Cleaning for ink smears" procedures described earlier in this chapter but problems persist, you should manually clean the paper-exit path. Refer also to
Cleaning for ink smears and jams: paper-feed rollers.
Occasionally, stray ink particles and oil become attached to the exit fingers, rollers, and guides under the exit cover causing ink streaks or marks on the top edge, front, or back of prints. When this occurs, you must clean these parts using both dry swabs and alcohol-soaked wipes.
Sample ink smear: paper-exit path
-
Open the exit cover.
-
Clean excess ink particles and oil from the blue exit fingers by gently wiping the top surface of each finger using a dry swab.
|
CAUTION
To avoid damaging the print drum and exit fingers, never scrape excess ink with a tool or fingernail; use a dry swab provided with the cleaning kit.
|
-
To clean the rubber exit rollers:
-
Wrap an alcohol-soaked wipe around the index finger of one hand.
-
Press your wipe-covered finger against each roller.
-
Use the thumbwheel to turn the rollers. Rotate the rollers four or five complete revolutions for each roller segment to ensure proper cleaning.
|
NOTE
You may notice some staining of the exit rollers while performing the cleaning procedure; this is normal and does not indicate additional cleaning is necessary. Simply clean rollers to remove any build-up of ink.
|
-
To clean the two sets of ribbed exit guides under the exit cover, gently wipe the raised ribs using an alcohol-soaked wipe.
|
CAUTION
To avoid damaging the print drum and exit guide, never scrape excess ink with a tool or fingernail; use only the materials provided with the cleaning kit.
|
-
Close the exit cover.
Cleaning for media tray jams
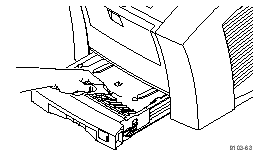
If the printer incorrectly feeds paper or transparencies, or feeds more than one sheet at a time from the media tray, you can correct the problem by cleaning the media-pick roller and separator pad.
Cleaning the media-pick roller
-
Remove the media tray from the printer.
-
Open the front cover.
|
CAUTION
Hot surfaces exist behind the upper paper-feed rollers. To avoid personal injury during cleaning procedures, do not reach in behind the paper-feed rollers.
|
-
Remove the maintenance drawer (A) from the printer.
-
To clean the top surface of the media-pick roller:
-
Locate the top of the media-pick roller behind the black rubber paper-path rollers.
-
Use a prepackaged alcohol-soaked cloth.
-
Scrub the top surface of the media-pick roller thoroughly. If the wipe becomes dirty, discard it and use another.
-
Replace the maintenance drawer (A) in the printer.
-
Close the front cover.
-
To clean the bottom of the media-pick roller:
-
Use a prepackaged alcohol-soaked cloth.
-
Reach into the media tray slot to access the pick roller.
Scrub the bottom surface of the pick roller thoroughly.
-
Replace the upper media tray in the printer.
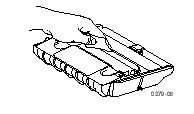
Cleaning the separator pad
-
Remove the upper media tray from the printer.
-
Gently wipe the separator pad using an alcohol-soaked cloth.
-
Inspect the separator pad for damage to the metal edge; it should be free of dents and lie flat against the rubber surface. If any damage is seen, the separator pad should be replaced.
-
Replace the upper media tray in the printer.
Cleaning for
lower tray jams: paper-feed rollers
If the printer feeds paper incorrectly or feeds more than one sheet at a time from the
High-Capacity Paper Tray Assembly, you can generally correct the problem by cleaning the paper-feed rollers.
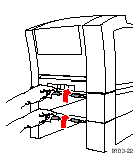
-
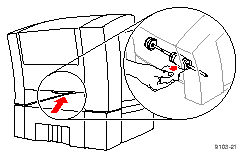
Remove the paper tray from the High-Capacity Paper Tray Assembly. If your printer has two assemblies, remove the tray from each one. The two paper-feed rollers for each assembly are visible when each tray is removed.
-
Using an alcohol-soaked cloth, scrub the rollers thoroughly. Rotate the roller several times to ensure proper cleaning.
-
Replace the paper tray in the High-Capacity Paper Tray Assembly.
Return to Topic List
|