|
Black-and-white prints instead of color
|
In the front panel's
Printer Defaults
menu, check the default setting for
Print Mode. If it is set to
Black Only, change the setting to
Color.
|
|
If your printer is a Phaser 740L printer (check the nameplate on the front of the printer), it will only print in black and white until you add color with the 740LCS Color Kit.
|
|
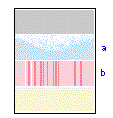
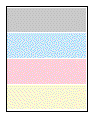
Print shows a single color (
a
) that is not uniform
or
Print shows a single color (
b
) with many vertical streaks (both light and dark) of slightly different density and non-uniform color.
|
Replace the color Toner Cartridge.
|
|
Print appears faded in a single color.
|
Check the
density setting: From the front panel, access the
Calibrate Colors
menu and print the Color Reference Page. Compare the settings to the examples on the
Color Density Samples
and, if necessary, adjust the density in the front panel. Refer to
Controlling color density.
Replace the color Toner Cartridge soon (depending on the complexity of your prints, you can continue to print up to 100 more pages).
|
|
A single color has a wide, light, vertical streak.
|
Replace the color Toner Cartridge.
|
|
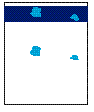
Print shows small,
repeating light or dark spots in a single color.
|
Replace the color Toner Cartridge.
|
|
A single color shows a light, repeating horizontal line.
|
To fix the problem:
-
Run 20-30 prints. The impression will disappear with continued time and use.
To avoid the problem:
-
Occasionally, or a day or two before installing a new Toner Cartridge, rotate the gear on the end of the cartridge by at least a quarter turn.
|
|
Prints are missing
fine-line detail.
|
Replace the Imaging Unit.
|
|
Dark color spots and dark or light streaks appear in all colors.
|
Replace the Imaging Unit.
|
|
Print shows a straight, thin and even,
light vertical line in all colors.
|
Replace the Imaging Unit.
|
|
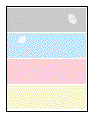
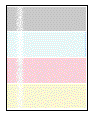
Each color "
bleeds" into the color band below it (the most visible is magenta in the yellow band).
|
Replace the Imaging Unit.
|
|
A single white spot appears in approximately the same vertical place on the page.
|
Run 20-30 blank pages of paper. If the problem persists, replace the Imaging Unit.
|
|
A single, wide, light horizontal band appears in one place on the page (near the top)
or
all colors are faded.
|
Wait overnight and print the Service Print 1. If print quality hasn't changed, replace the Imaging Unit.
|
|
Large
light spot(s) appear randomly in the print, approximately on the same horizontal and vertical place
or
they move vertically from one print to another.
|
Print several pages until the artifacts fade.
|
|
A smear in the image repeats at the same location on the page.
|
Replace the Imaging Unit.
|
|
One
or more vertical, dark and even fine lines appear on the print through all colors.
|
Replace the Imaging Unit; make sure that the old Imaging Unit is not exposed to light for more than 3 minutes.
If a new Imaging Unit does not correct the problem:
-
Put the old Imaging Unit back into the printer.
-
Repack the new Imaging Unit.
-
Replace the Fuser.
Fuser order numbers:
110 Volt:
016-1660-00
220 Volt:
016-1661-00
|
|
A piece of the printed image is missing and reappears out of place, approximately 129 mm (5 in.) down the page.
|
-
Print 20 pages of blank pages to clean the roller.
If you still see the problem:
If you still see the problem:
|
|
The surface of the printed image appears to have vertical scratches (visible by holding the print at an angle and observing the "shine" of the image).
At first, the scratches appear only on the printed image; eventually, dark vertical scratches appear on the unprinted portion of the page.
|
Replace the Fuser (depending on your quality needs, you can continue to print until the dark vertical lines appear).
|
|
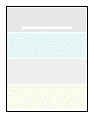
Light vertical streaks appear in all colors (most easily visible in yellow).
|
Replace the Main Charge Grid. Complete instructions are packaged with the Main Charge Grid.
|
|
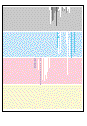
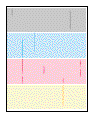
Dark and wavy vertical streaks appear in all colors.
|
The solution is one of the following:
-
Remove and reinsert the Main Charge Grid.
-
Replace the Main Charge Grid.
-
Replace the Imaging Unit.
|
|
The print is extremely light with a "washed out" look.
|
The solution is one of the following:
-
If using a paper tray or transparency tray, make sure you have loaded the correct media in the tray you are using.
-
If using the Multi-Purpose Tray, make sure you have selected the correct media type at the front panel prompt.
-
Remove and reinsert the Main Charge Grid.
-
Replace the Main Charge Grid.
-
Replace the Imaging Unit.
-
Replace the Transfer Kit.
|
|
The entire page prints in black, including the borders.
|
The solution is one of the following:
-
Re-insert the Main Charge Grid.
-
Replace the Main Charge Grid.
-
Repalce the Imaging Unit.
-
Call Service. See
Customer Support Centers.
|
|
Toner spots appear on the back of the media.
|
Replace the Transfer Kit.
|
|
The page prints in black in the image area only (the borders are white).
|
Turn the printer off and back on again. If the problem persists, call Service. See
Customer Support Centers.
|
|
The page is blank.
|
-
Remove and re-insert the Imaging Unit.
-
Turn the printer off and back on again.
-
If the problem persists, call Service. See
Customer Support Centers.
|
|
Thin horizontal stripes or a "weave" pattern appears in a complex image.
|
Increase the amount of memory.
or
Print the image at a lower resolution.
|
|
Prints have dull, faded colors
|
-
If you are using a media tray, make sure that you have loaded the correct media in the paper tray or transparency tray.
-
If you are using the Multi-Purpose Tray, make sure that you have selected the correct media type in the printer's front panel.
|
|
Print the Color Reference Page from the front panel's
Calibrate Colors
menu. Check the density settings for each color and compare them to the examples on the
Color Density Samples
card. (in the User Guide).
|
|
Print the Consumables Page and Service Print 1 from the front panel's
Help Pages.
-
If all colors are faded on the Test Print, the Imaging Unit may need to be replaced. Refer to the
% Remaining
gauge for the Imaging Unit on the Consumables Page.
-
If one color is faded (and you have checked and/or adjusted the density setting for that color), replace the Toner Cartridge.
|
|
Make sure that the Imaging Unit stays covered until immediately before installing it in the printer. Exposure to light can damage the Imaging Unit and will produce light streaks or faded prints.
|
|
Make sure that the Toner Cartridges are installed correctly.
|
|
Make sure that you use a high-quality laser paper: 60 - 90 g/m2 (16 - 24 lb.) paper in the media trays and 75 - 150 g/m2 (20 - 39 lb.) paper with the Multi-Purpose Tray. Refer to
All about media
for more information.
|
|
Use only Xerox transparencies. Xerox does not guarantee the results of non-Xerox transparencies in Xerox printers.
|
|
Try a different color correction mode.
|
|
Image is very faded or pieces of the image are missing; toner on the page is loose.
|
When using the Multi-Purpose Tray, make sure that you have selected the correct media type in the printer's front panel menu.
|
|
Photographic images appear grainy
|
Check the front panel's
Print Quality
menu. If the selected mode is
Presentation, change it to
Standard.
|
|
Streaks or spots
|
Most spots are caused by fingerprints or dust introduced into the printer while installing the Imaging Unit or loading media.
Make sure that the surface where you unpack the Imaging Unit, paper, and transparencies is free of dust. Keep supplies in a covered area or a closed box.
|
|
Make sure that the Imaging Unit stays covered until immediately before installing it in the printer. Exposure to light for more than 3 minutes can damage the Imaging Unit.
|
|
Do not touch the right side or underside of the Imaging Unit; fingerprints affect print quality.
|
|
Make sure that the media is clean.
|
|
Make sure that you handle the media on the outside edges to avoid fingerprints.
|
|
To get rid of fingerprint spots, print a few prints (you can print any of the Help Pages in the front panel menu).
|
|
The back of the printed page appears dirty.
|
Toner particles have contaminated the transfer roller. This can happen if the printed image is larger than the media (for example, when printing on envelopes). Run 10-20 prints to clean the transfer roller.
|