|
PhaserShare Series B Network Card Installation
|
|
These instructions explain how to install one of the PhaserShare Series B network cards into the network card slot located on the rear panel of your printer. The steps for installing a PhaserShare Series B network card in the printer are basically the same for any card. However, the Token Ring card requires a jumper to be properly positioned on the card to properly support the speed of the Token Ring network.
NOTE
Installing the PhaserShare 100BaseT Ethernet Network Card disables the built-in 10BaseT Ethernet Port. The standard, built-in port can no longer be used.
Static electricity precautions
-
Leave the printer plugged into its power outlet; this preserves a ground path for static discharges.
-
Touch the printer's bare metal frame often to discharge static electricity from your body.
-
Handle the circuit board(s) by their edges only.
-
Do not lay the board(s) on a metal surface.
-
Make the least possible movements to avoid generating static electricity.
-
Avoid wearing wool, nylon or polyester clothing; they generate static electricity.
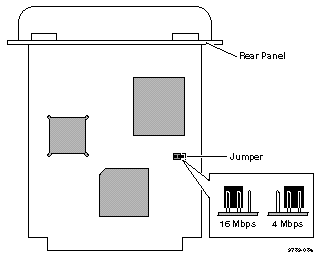
Setting the ring-speed jumper on the
Token Ring card
The Token Ring card is equipped with a single three-pin jumper to set the ring speed. The settings are as follows:
-
Jumper at 16 (factory default): 16 Mbps (megabits per second)
-
Jumper at 4: 4 Mbps
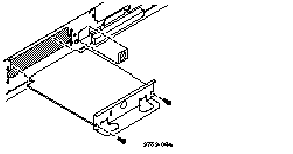
Network card installation
NOTE
EtherTalk, LocalTalk, and TokenTalk protocols require you to attach the network cable to the printer with the printer powered off. After connection, turn on the printer.
-
Power down the printer. Do not unplug the printer; this preserves a ground path to dissipate static charges.
-
Remove the network card cover plate from the rear panel of the printer. Save the mounting screws for use in the next step.
-
Slide the network card into the card slot and firmly push it into place. Secure the card in place with the mounting screws.
-
Peel the backing off the label with the "Ø" symbol and apply it over the "Ethernet" port on the rear of the printer.
|
NOTE
The Ethernet port on the rear panel is disabled when the PhaserShare Series B network card is installed. Covering this port with the label prevents making an inadvertent connection in the future.
|
Return to Quick Network Setup Instructions
|
|
| |
|