|
The printer features two DIMM connectors which accept 16-, 32-, 64-, and 128-Mbytes RAM DIMMs. Ask for any of these upgrade kits:
-
ZMB16 - 16 Mbyte Memory Upgrade
-
ZMB32 - 32 Mbyte Memory Upgrade
-
ZMB64 - 64 Mbyte Memory Upgrade
-
ZMB128 - 128 Mbyte Memory Upgrade
Static electricity precautions
-
Leave the printer plugged into its power outlet; this preserves a ground path for static discharges.
-
Touch the printer's bare metal frame often to discharge static electricity from your body.
-
Handle the circuit board(s) by their edges only.
-
Do not lay the board(s) on a metal surface.
-
Avoid wearing nylon or polyester clothing; they generate static electricity.
Installation
The printer's built-in Configuration Page, lists what size RAM DIMM are installed in each of the printer's RAM DIMM slots. If necessary, scroll though the front panel's Help Pages, and print the Configuration Page to determine what size and type of RAM DIMMs are installed in your printer.
-
Turn off the printer. Do not unplug the printer; this preserves a ground path to dissipate static charges.
-
Disconnect all host interface cables.
-
Remove the two screws securing the board's rear panel to the printer.
-
Grasp the rear panel by the knob and slide the board out of the printer card cage.
CAUTION
Do not install a RAM DIMM in the slot labeled FONT. Printer damage will result.
-
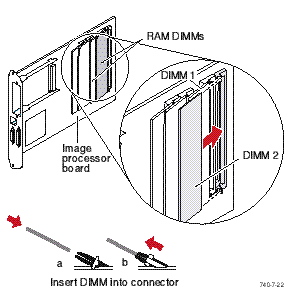
If you must remove a small-capacity RAM DIMM to install a larger-capacity RAM DIMM, spread the latches of the installed RAM DIMM securing each end of the DIMM in the connector.
-
Insert a memory module in an empty connector labeled DIMM 1or DIMM 2 (or J780 or J781). When properly inserted, a tab on each end of the connector slips into a slot on each end of the RAM DIMM.
-
Reinstall the image processor board into the printer.
-
Print a configuration page to check its listing of the printer's memory and options.
-
Update your host computer's printer driver; this involves configuring the printer driver residing on your computer. This is discussed in the Phaser 740 Setup Guide as well as in the printer CD-based document Advanced Features and Troubleshooting Manual.
|