|
Clearing a media jam
|
|
If the printer has frequent media jams, make sure that you follow these guidelines:
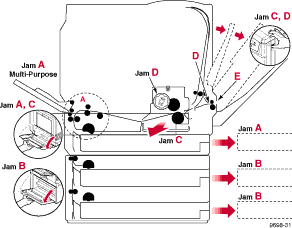
If a media jam occurs, the front panel reports Jam at <Location>. The <Locations> are the various sensors throughout the paper path, listed as A through E.
The following illustration shows the locations of the sensors that report a media jam (A through E).
- Open the left side door (if your printer has a Lower Tray Assembly installed, open the Upper left side door).

- Remove the complete piece of jammed media.

Jam at A - Solution 2
- Remove the media tray (if your printer has a Lower Tray Assembly installed, remove the Upper media tray).

- Remove the complete piece of jammed media from inside the printer.

Jam at B - Solution 1
- Open the lower left side door.

- Remove the complete piece of jammed media.
x
- Remove the selected media tray (Middle or Lower media tray).

- Remove the complete piece of jammed media from inside the printer.

Jam at C
Caution: The Fuser is hot; to avoid personal injury, wait 10 minutes for
the Fuser to cool before touching it.
- Remove the Fuser:
- Open the printer's front door.
- Turn the small blue thumbscrew counterclockwise to
unlock the Fuser.
- Slide the Fuser out of the printer.

- Remove the Fuser Roll:
- Press out on the two tabs to unlock the Fuser Roll.
- Lift the Fuser Roll out of the Fuser and set it aside.

- Turn the Fuser's large blue knob clockwise or counterclockwise to release the jammed media.
- Remove the complete piece of jammed media from the Fuser.

- Re-insert the Fuser Roll into the Fuser (press firmly to snap it into place); re-install the Fuser.
Note: The Fuser must be removed and re-inserted to clear the front
panel error message.
Caution: The Fuser is hot. To avoid personal injury, wait 10 minutes
after open the front door for the Fuser to cool before touching it.
Warning:
First check the exit opening for media that has jammed and
folded like an accordion. It is especially difficult to see if the
media is transparency film.
- Open the front door to access the Fuser.
- Pull open the access door (above the plastic output tray); the media is visible.
- On the Fuser, turn the large blue knob counterclockwise.
- Remove the media from inside the access door.

Caution: If the Fuser knob will not turn, do not force it or you may
damage the Fuser. Instead, follow these steps:
- Open the front door and the right side door.
- Turn the Fuser's large blue knob counterclockwise to release the jammed media.
- Remove the jammed media from the right side of the printer.

Remove the jammed media from the output tray.

Pull open the access door (above the plastic output tray) and remove the media.

- Remove all media in the Multi-Purpose Feeder.
- Remove the complete piece of jammed media from the Multi-Purpose Feeder.
- Make sure that you set the Media Thickness switch for the media that you are using.
- Re-insert the media in the Multi-Purpose Feeder.
- Open and close the printer's front door to clear the error message in the front panel.

|
| |
|